Shopify + Facebook: Integration Tricks to Triple Sales!
By A Kishore Aksharthan on 3/1/2024 · 10 minute read

Getting Started: Understanding Shopify’s Facebook Channel
Utilizing the Shopify Facebook channel, available through the Shopify app store, offers the convenience of selling and advertising on both Facebook and Instagram. This tool also provides valuable insights into one’s performance and customer behavior.
To get started, it’s necessary to be subscribed to the Basic Shopify plan or higher. Additionally, having a Facebook account is mandatory. For those without a Facebook account, there will be guidance through the process of creating one when attempting to integrate the Sales channel.
The process continues with the allocation of a Facebook business page to a single Facebook Business Manager, though it’s possible to assign additional admins thereafter. For the Shopify Facebook integration, one must hold admin rights to both the Facebook Business Manager who owns a specific Facebook page, and the Facebook page itself.
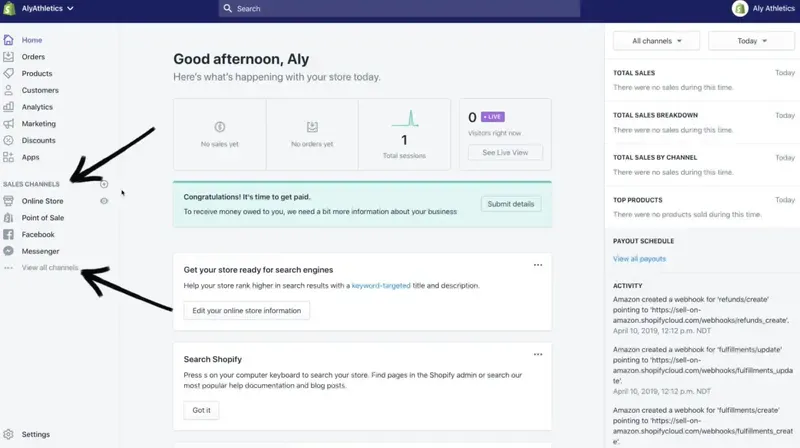
In cases where a store is notified about ineligibility for a sales channel installation, there is an option to click on “You can’t add this channel” to understand the underlying reasons.
How to Install and Set Up the Facebook Channel on Shopify
- Navigate to the Shopify admin panel and click the
+next to Sales Channels. - Select the
+next to Facebook. - Choose “Update Sales Channel” followed by “Start Set-Up”.
- Opt for “Connect Account”.
- Proceed to sign into Facebook.
- Ensure the required Facebook assets are connected.
- Agree to the terms and conditions.
- Complete the setup by clicking Finish.
After configuring the Facebook channel, Shopify products will automatically synchronize with Facebook. This Shopify Facebook integration allows for the selection of available products directly from the Product page or through the bulk editor within the Facebook channel.
Once a product is made available on the Facebook channel, it becomes accessible across all enabled features within that channel. Therefore, it’s not possible to restrict a product’s availability to a single feature if multiple features are activated.
For example, if both Facebook Shop and Instagram Shopping are enabled and a product is made available to the Facebook channel, it will also be accessible on Instagram Shopping.
It should be noted that Shopify collections do not sync with Facebook by default. Unique collections for Facebook can be manually created using the Facebook Commerce Manager.
Make Your Products Available to Shopify’s Facebook Channel
After the Shopify Facebook integration process, to access the products that are available to be featured on the Facebook channel, one should navigate through the Shopify admin by selecting Facebook, then Overview, and finally “View Products”. To add new products to the store, the option “Add Product” needs to be clicked on. For those products already in the store but not accessible on the Facebook Shop, choosing “Make Products Available” will redirect to the Products page in the admin area.
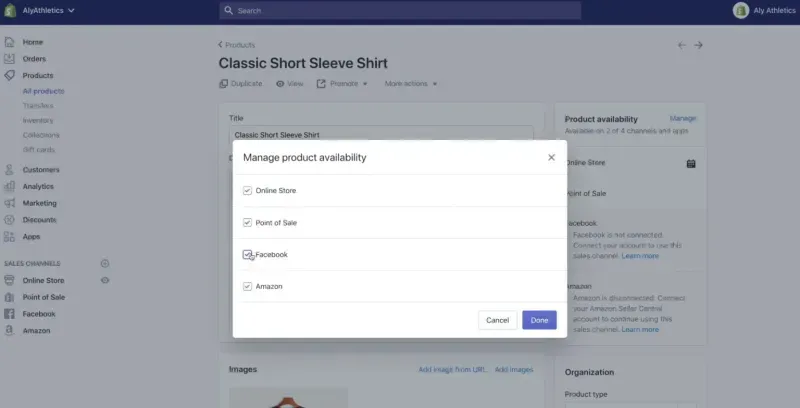
The following steps should be taken to make a product available on the Facebook channel:
- Choose the product intended for availability on the Facebook channel.
- In the Product Availability section of the product’s page, click on “Manage.”
- Select “Facebook,” proceed to click Done, and then ensure to Save the changes.
Product Images
When uploading images to Facebook, it is notable that the platform reshapes non-square images into squares. This implies that landscape images, for instance, will be adjusted to fit this format. Therefore, to guarantee that product photos are displayed as intended, it is advisable to pre-crop images into squares that align with Facebook’s specifications.
Product Status
The Product status section is designed to highlight any issues with product listings. By selecting View Products, one can explore a detailed list of errors. For concealing products, the steps are as follows: Navigate to Products > Collections in the Shopify admin.
- Choose the product intended to be hidden
- In the Product Availability section, select Manage.
- Deselect Facebook, confirm by clicking Done, and ensure to save the changes.
What is Facebook Shop, and How to Sell on Facebook
Display Shopify products on a Facebook Page by utilizing the Facebook Shop feature available through the Facebook channel. By setting up Facebook Shop, a Shop section is created on a Facebook Page, showcasing Shopify products.
How to Set Up Facebook Shop in the Shopify Facebook Channel
Steps to Set Up a Facebook Shop:
- Begin by installing the Facebook Channel on Shopify.
- Choose the Facebook Shop option within the platform.
- For those who have already installed the channel and selected a different feature during the initial setup, the “Facebook Shop” can be accessed from the Overview page of the Facebook channel.
- Individuals utilizing Instagram Shopping can activate this feature directly from the “Facebook Shop” section located on the channel’s Overview page.
- In the case that Facebook Marketing has been set up previously, linking a Facebook Commerce Manager account to the Facebook channel is necessary. This can be done by selecting “Start Setup” in the “Facebook Shop” area of the Overview page.
- Proceed to connect the required assets as specified.
- Agree to the terms outlined by Facebook to finalize the setup.
It’s important to note that Facebook may take up to 48 hours to review and approve the product listings in the store, and notification will be provided once the review is complete. Should there be any issues with store approval, reaching out to Facebook directly for clarification is advisable.
If the Facebook Shop is not displaying on the assigned Facebook Page, checking for any discrepancies within the channel’s section in Shopify admin is recommended.
Product Eligibility for Facebook Shop
In order to list a product on Facebook Shop, it must adhere to specific criteria. Shopify outlines that the product should:
- Be accessible to Facebook users.
- Require physical shipping, excluding digital products.
- Include a clear return policy.
- Have a product title under 100 characters without the use of all caps.
- Feature both a product description and an image.
- Comply with Facebook’s Commerce Policy and not breach Facebook’s Community Standards.
- Be priced, as free products are not permissible.
Meeting these requirements ensures that products are eligible for sale on Facebook Shop, facilitating a smoother integration with the platform.
Customer Experience on Facebook Shop
Once an account is verified, Facebook incorporates a ‘Shop Now’ button into the primary Facebook Page. This button serves as a link to the Shop section on the Page. Nevertheless, alterations to the button’s configuration are possible, allowing it to directly connect to a Shopify store.
Customer Inquiries
Customers have the option to send direct messages through Messenger. Alternatively, they can reach out via email by utilizing the “Contact Seller” button on Facebook, which routes inquiries directly to the customer support email established in the Shopify admin.
Checkout on Facebook
Transactions on Facebook are streamlined from the beginning to the end. When customers decide to make a purchase, they are guided to the product page on the Shopify store. At this stage, they can either proceed to add the product to their cart and checkout or keep browsing for more items. The order is recorded on the Orders page of the Shopify admin, indicating it originated from Facebook. Opting for “Checkout on Instagram and Facebook” allows customers to finalize their purchases directly within Facebook, eliminating the need to navigate away.
How to Set Up the Facebook Pixel on Shopify
The Facebook pixel is a tool that enables the tracking of customer data and behavior on a store through the Facebook channel. It plays a crucial role in enhancing the marketing and advertising performance of the store.
There are options available for the extent of data tracking:
- Standard sharing involves tracking only customer behavior.
- Enhanced and Maximum settings allow for the tracking of customer behavior along with additional information such as name, location, and email address.
The creation of Facebook pixels can be done through Facebook Ads Manager or directly within the Facebook channel. For those who have previously integrated a Facebook pixel into their store’s theme code, it is necessary to remove that code after setting up a new pixel using the Facebook channel.
Creating a Facebook pixel
Creating a pixel can be effortlessly accomplished. One simply needs to select “Create New” in the pixel set-up box within the Facebook channel. Alternatively, consulting the Facebook Help Center provides guidance on creating one through Facebook Ads Manager.
Adding a Facebook pixel to your online store
Integrating the Facebook pixel with an online store enhances the functionality, especially for those utilizing Instagram Shopping, Facebook Shop, or Facebook Marketing. It’s particularly essential for leveraging the full features of Facebook Marketing.
Setting Up the Facebook Pixel for Shopify Explained
- By enabling data sharing in the “Customer data-sharing” area, management of the pixel becomes accessible under the “Data Sharing” option within the Facebook channel’s “Settings” section.
- The “Customer Data Sharing” area within “Data Sharing” displays any pixels that have been created.
- To integrate a preexisting Facebook pixel, selecting the “Connect” option will facilitate this process.
How to Change or remove a Facebook pixel from your online store
- Navigate to Facebook > Settings within the Shopify admin interface.
- Delete the current pixel found under the Data Sharing Settings section.
- Proceed to link the new pixel.
- Ensure the removal of any preexisting pixel code, especially if there has been prior alteration to the theme code. It’s crucial to prevent the presence of multiple pixels in the code, which can lead to inaccurate data.
For optimal integration of the Facebook pixel, it is generally recommended to employ Google Tag Manager, which allows for centralized management alongside other pixels and tracking codes. Alternatively, for a more immediate solution, the code can be directly inserted into Shopify.